“Faith is taking the first step even when you don’t see the whole staircase.” – Martin Luther King
 When I first started with XPO I could swear there was something magic involved in how it was handling my data. I had no idea what was going on, but I knew that if I derived my classes from XPObject or BaseObject (if you use XAF), I automatically had my classes turned into tables in a database of my choosing, I had an autogenerated Built-in OID key, Deferred Object Deletion, and Optimistic Locking. And honestly, that was all I care about. If I wanted to use a different database; it was as simple as changing my connection string.
XPO was handling all of that backend pain in my behalf, and although really mysterious it solved my problems fast and elegantly. Don’t get me wrong I like to know what is happening behind door number 1, (I believe XPO is ORM number 1 in my toolbox) but as an end user, as a consumer, all I need is: What do I do? How do I do it? How long it takes?
DevExpress has amazing support, there is no denying of that, but some of their tutorials leave a lot to be desired. Some of their articles assume a lot of knowledge on our side and their tickets are somewhat sparse between all their versions. Big Disclaimer: All of my information really comes from their documentation and tickets (they do have really good information), but I would argue some platform independent simplification of the XPO getting started here and here will do wonders for the novice developer.
In this article, we will focus on step 1 of XPO in Xamarin but the concepts explained here apply to any other platform and I will highlight when it doesn’t.
Are you ready?
Let’s start.
Installing XPO
For the majority of scenarios, installing XPO is as simple as installing the XPO Nuget package:
Install-Package DevExpress.Xpo -Version 18.1.6 (or any version available by the time you read this)
In a Xamarin solution, you would install this package in your .Net Standard Project as well as your platform specific projects. (iOS, Android, UWP, etc..).
Adding the XPO helper static class
public static class XpoHelper
    {
        static readonly Type[] EntityTypes = new Type[] {
            typeof(Item)
        };
        public static void InitXpo(string connectionString)
        {
            var dictionary = PrepareDictionary();

            if (XpoDefault.DataLayer == null)
            {
                using (var updateDataLayer = XpoDefault.GetDataLayer(connectionString, dictionary, AutoCreateOption.DatabaseAndSchema))
                {
                    updateDataLayer.UpdateSchema(false, dictionary.CollectClassInfos(EntityTypes));
                    new UnitOfWork(updateDataLayer).CreateObjectTypeRecords();
                }
            }

            var dataStore = XpoDefault.GetConnectionProvider(connectionString, AutoCreateOption.SchemaAlreadyExists);
            XpoDefault.DataLayer = new ThreadSafeDataLayer(dictionary, dataStore);
            XpoDefault.Session = null;


        }
        public static UnitOfWork CreateUnitOfWork()
        {
            return new UnitOfWork();
        }
        static XPDictionary PrepareDictionary()
        {
            var dict = new ReflectionDictionary();
            dict.GetDataStoreSchema(EntityTypes);
            return dict;
        }


    }
Don’t get overwhelmed by this code. This is just Boilerplate code needed to configure your connection to the Database. Let’s (without going in too deep) break it apart.
- EntityTypes includes an array of Type where Item it is just a class defined by you that will be the link to your assembly used by the PrepareDictionary method. (XPO use Reflection to get metadata about your classes and fields and generates according, your database schema)
- InitXpo does exactly that, with a connection string as a parameter it updates the schema and initializes the default DataLayer as a ThreadSafeDataLayer due to the multi-threading nature of Xamarin Applications.
- And lastly, it gives us the CreateUnitofWork method. This is what you are going to be using all the time. Unit of Work keeps track of every change to your objects and with a single call to UnitOfWork.CommitChanges save this changes to the database.
If anything just paste this code in your application and replace the Item class with one of your own.
Let’s actually use it.
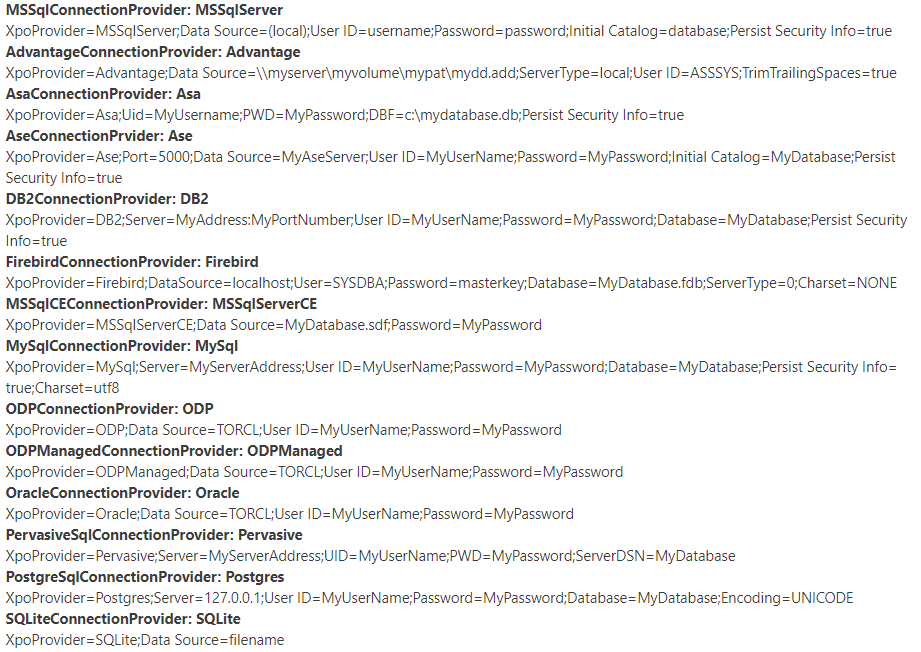
Finally, we got to the fun part. Create a connection string of a database of your choosing as seen above and then it is as simple as:
Declare your Persistent Object:
[Persistent]
    public class Item : XPObject
    {
        public Item()
        {
        }

        public Item(Session session) : base(session)
        {
        }

        string description;
        public string Description
        {
            get { return description; }
            set { SetPropertyValue("Description", ref description, value); }
        }


    }
Create an instance of it.
XpoHelper.InitXpo(connectionString);  //This is just need it once at the App.cs level

//Create your UnitOf Work and your Persistent Object

var uoW = XpoHelper.CreateUnitOfWork();
Item Object = new Item(uoW);
Object.Description = "My first Xpo Object in Xamarin";

//And commit changes to the database
if (uoW.InTransaction)
uoW.CommitChanges();
And That’s it
Go and check your database and you will have an Item Table with a record of “Mi first Xpo Object in Xamarin”.
A couple of notes before I go:
First: We call persistent objects to all class derived from XPO Classes. If you follow that link, you will see how you can choose to not inherit from XPObject for more granular control. Want to create your own Oid? Don’t want deferred deletion or optimistic locking? No problem, choose XPBaseObject, XPOCustomObject or XPLiteObject. The last one it is handy when mapping a persistent class to a view in a legacy database. (That is a topic for another article)
Second: The UnitofWork besides being passed as a parameter to your persistent class constructor is the middleman between your application and the database. There are a lot more layers involved, but as far as we are concerned, all we need to know is that UnitOfWork keeps track of every change made in our objects and with a single UnitOfWork.CommitChanges call, all the changes made to the persistent objects are automatically saved to the database or rolled back if there is an error. It makes sense now that after all the configuration, this is mainly what you will be using all the time.
And lastly: If you were paying attention, the description property of the Item class use the SetPropertyValue() method that implicitly implements INotifyPropertyChanged making possible a really concise ViewModel. (That is another article in the making)
There is a lot more to cover:
- Using the UnitOfWork to query for Data.
- Using XPCollection to retrieve all or a subset of objects of the specified type from the database and as an example present them in a listview. Check BIT.Xpo.Observables.
- XPO One-to-Many and Many to Many Relationship.
- Life Cycle of Persistent Objects with their OnSaving(), AfterConstruction() and OnDeleting() methods.
- CodeRush Shortcuts. These templates are huge time savers.
We are in Part 1 and there are still a lot of parts to come because I feel I would have benefited a lot from some articles like this one when I was starting.
In the meantime how do I get help?
If you have XPO paid license there is no substitute to their support, if you don’t, check their public tickets and search for your question, I have found a lot of answer to my issues doing this. Also, contact me, (I am always happy to help) and don’t forget to join our new facebook group and feel free to post your issues.
Also, check the sample code of this repo for more clarity and although our focus is Xamarin take a look at using XPO in a console application here. Slowly, we (together) will fill the gap of Xamarin based XPO samples.
As always, until next time Xpo Out!